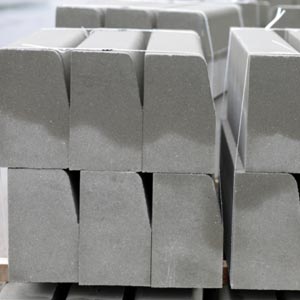
Power Kerb Stone
Kerb Stone

Advantages

Uniform Size

Highly Durable.

Improves Safety

Economical

Built-in drainage systems

Weather resistance
| Technical Details | |
|---|---|
| Types | Straight, Bull Nose, Bevel, Cant etc. |
| Colour | Grey |
| Heights Available | 150mm to 600mm |
| Weight | 30 to 200 Kg (Depending upon the size and shape). |
| Water Absorption | 3 to 6 % weight of the block |
| Compressive Strength | 8-40 Mpa |
| Vibration Frequency | 50-90 Hz |
| Material Compaction System | Dual Vibration + Pressure Based. |
Steps for laying Power Kerb Blocks
- Prepare the subgrade ensuring that it is compacted and levelled.
- Place a layer of granular sub-base material.
- Compacted bedding layer of mortar or concrete mix along the edge.
- Place the kerb stones onto the bedding layer, ensuring that they are level and aligned properly. Use a rubber mallet or mechanical compactor to tap the stones into place.
- Fill the joints between the kerb stones with mortar or concrete mix, ensuring that they are completely filled and flush with the top of the kerb stones.
- Smooth the surface of the jointing material and clean any excess material from the surface of the kerb stones.
- The area behind the Kerb Stone should be backfilled with soil or other material and compacted to provide stability to the wall.
- Allow the jointing material to cure for the recommended time before allowing any traffic or other loads onto the kerb stones
Application procedure of Kerb Stone
Planning: Determine the location, elevation, and slope of the kerb stone. Prepare the subgrade by excavating the soil to the required depth, and ensuring that it is compacted and levelled.
Base material: Place a layer of granular sub-base material, such as crushed stone or gravel, over the subgrade to provide a stable base for the kerb stones.
Bedding: Create a level, compacted bedding layer of mortar or concrete mix along the edge where the kerb stones will be installed. The thickness of the bedding layer should be equal to the thickness of the kerb stone.
Installation: Carefully place the kerb stones onto the bedding layer, ensuring that they are level and aligned properly. Use a rubber mallet or mechanical compactor to tap the stones into place.
Jointing: Fill the joints between the kerb stones with mortar or concrete mix, ensuring that they are completely filled and flush with the top of the kerb stones.
Finishing: Smooth the surface of the jointing material and clean any excess material from the surface of the kerb stones.
Curing: Allow the jointing material to cure for the recommended time before allowing any traffic or other loads onto the kerb stones.
Area of Application


Edging, Land Scaping Feature, Pavement Marking, Road Safety, Demarcation etc.

Do's
- 1. Use the right equipment and follow safety guidelines when handling kerb stones to prevent accidents or injury.
- 2. Check local regulations and requirements before installing kerb stones to ensure compliance and avoid potential fines or legal issues.
- 3. Choose the right type of kerb stone for the application, considering factors such as height, material, and design features.
- 4. Prepare a stable foundation and use proper installation techniques to ensure the kerb stones remain secure and stable over time.

Don'ts
- 1. Install kerb stones without first checking for underground utilities or other potential obstacles.
- 2. Overload or strain equipment during transportation or installation, as this can damage the kerb stones or create safety hazards.
- 3. Install kerb stones without proper safety equipment or training, which can result in accidents or injuries.
- 4. Use kerb stones in areas where they are not designed or intended to be used, as this can compromise their effectiveness and safety.
Safety Measures


Safety Procedure while fixing of Kerb Stone
- 1. Personal Protective Equipment (PPE): Wear appropriate PPE, such as gloves, safety glasses, hard hats, and safety boots to protect yourself from hazards associated with handling and installing kerb stones.
- 2. Traffic Control: If the installation area is near a roadway, set up proper traffic control measures, such as signs, barricades, or cones to protect workers and alert drivers of the construction activity.
- 3. Lifting and Handling: Use proper lifting techniques and equipment, such as cranes or forklifts, to lift and move the heavy kerb stones. Do not attempt to lift or move kerb stones manually.
- 4. Work Area: Keep the work area clean and free of clutter to avoid tripping hazards. Ensure that there is adequate lighting and ventilation.
- 5. Secure the Kerb Stone: Ensure that the kerb stone is securely in place before jointing or finishing. Kerb stones that are not properly secured can cause injury to workers or the public.
- 6. Tools and Equipment: Use properly maintained and calibrated tools and equipment. Inspect them regularly for damage or wear and replace or repair as necessary.
- 7. Training: Ensure that all workers involved in the installation process have received proper training and are familiar with the safety procedures and protocols.
